Atera QuickBooks integration allows users to bring in invoices that the accounting program recognizes. This integration aligns customers, products, and taxes between the two platforms which makes financial management easier.

In this article, we will explore the benefits of Atera QuickBooks integration, and how to integrate the two platforms.
- What is Atera?
- Does Atera Integrate with QuickBooks?
- How to Set Up Atera QuickBooks Integration?
- Step 1: Activate Atera Integration in QuickBooks
- Step 2: Link Atera with QuickBooks
- Step 3: Customize Atera Integration Settings
- How to Sync Atera with QuickBooks Online?
- How to Manage Atera QuickBooks Integration?
- How to Export Invoices with Atera QuickBooks Integration in Online?
- How to export Invoices with Atera QuickBooks Integration in a Desktop?
- How to Disconnect Atera QuickBooks Integration?
- What are the Benefits of Atera QuickBooks Integration?
What is Atera?
Atera offers a complete IT management platform designed specifically for managed service providers (MSPs) and IT. This platform offers a wide range of features, such as:
- Remote monitoring and management (RMM),
- Remote access,
- Ticketing and Reporting, that enable IT personnel to effectively manage networks, devices, and assets.
Does Atera Integrate with QuickBooks?
Yes, Atera offers seamless integration with QuickBooks Online. This integration allows businesses to sync data between Atera and QuickBooks, eliminating physical data entry and ensuring correct financial information.
How to Set Up Atera QuickBooks Integration?
Setting up the integration between Atera with QuickBooks is a simple procedure. Adhere to these steps to configure the integration:
Step 1: Activate Atera Integration in QuickBooks
To integrate Atera with QuickBooks, first, activate the Atera integration within your QuickBooks account. Here is the process:
- Sign in to your QuickBooks Online account.
- Navigate to the Apps section and look for “Atera” using the search function.
- Choose the Atera app and opt for “Get App Now.”
- Proceed with the on-screen guidelines to authorize the Atera app in your QuickBooks account.
Step 2: Link Atera with QuickBooks
After enabling the Atera integration in QuickBooks, you must link your Atera account to QuickBooks. Here’s the procedure:
- Sign in to your Atera account.
- Access the Admin tab and choose “Integrations” from the dropdown menu.
- Tap on “Connect” next to QuickBooks.
- Adhere to the instructions to authorize the connection between Atera and QuickBooks.
Step 3: Customize Atera Integration Settings
Once Atera is linked with QuickBooks, you can tailor the Atera QuickBooks integration settings to control data exchanged between the two applications. Here are essential settings you can modify:
- Sync Frequency:
- Determine the frequency of data sync between Atera and QuickBooks.
- Data Mapping:
- Align Atera fields with corresponding QuickBooks fields for precise data synchronization.
- Invoice Settings:
- Define default invoice preferences, including invoice terms and payment terms.
- Expense Settings:
- Configure how expenses from Atera are recorded in QuickBooks.
How to Sync Atera with QuickBooks Online?
Atera QuickBooks integration allows you to sync data with the online version of the accounting program very easily. The steps mentioned below will help you achieve this through the Atera Admin Page.
- Access Admin > Accounting.
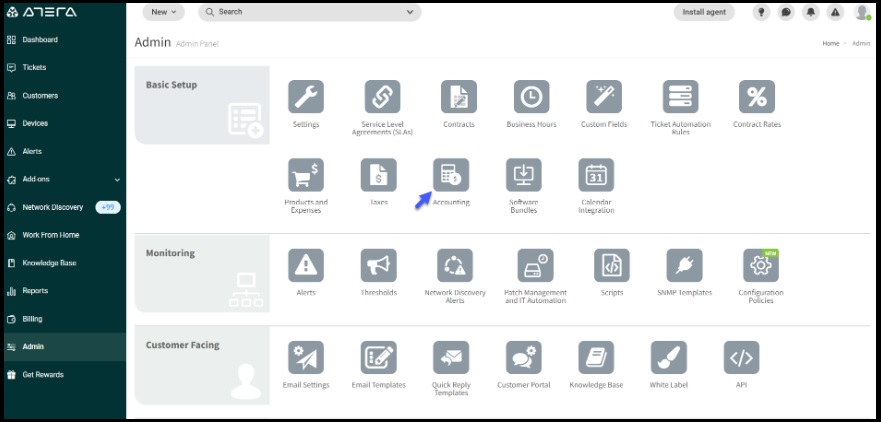

- In the Accounting Software Integration tab, select Connect (under the QuickBooks logo).

- Input QuickBooks Online credentials and choose Sign In.
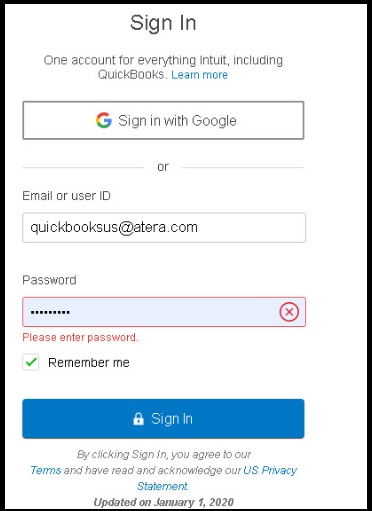
- Click Connect on the Connecting to Atera page.

- Select Next after reading the wizard welcome page.
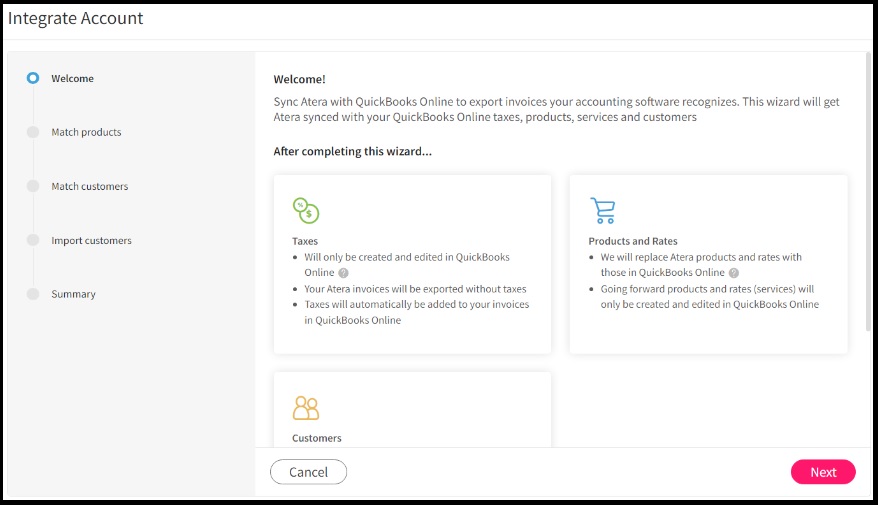
- Match products: Atera will automatically find exact product matches between Atera and QuickBooks Online.
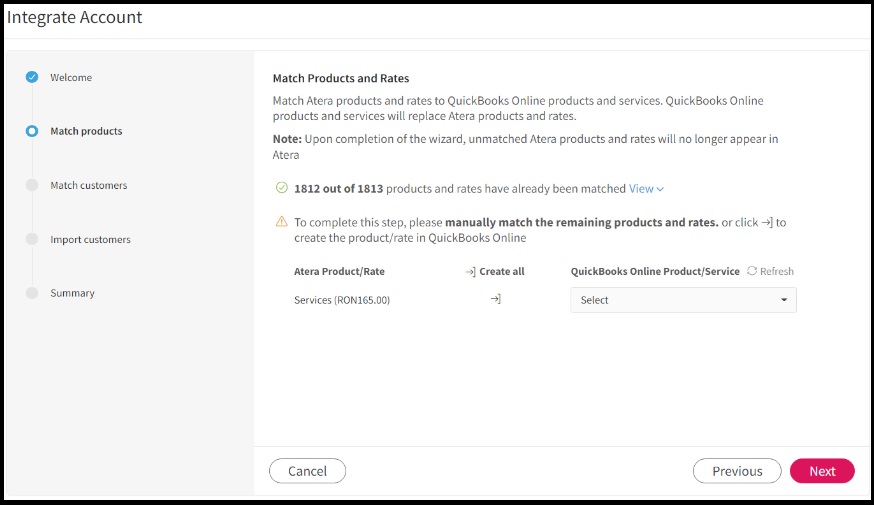
- Manually match unmatched items and create new matches if necessary.
- Import Customers.
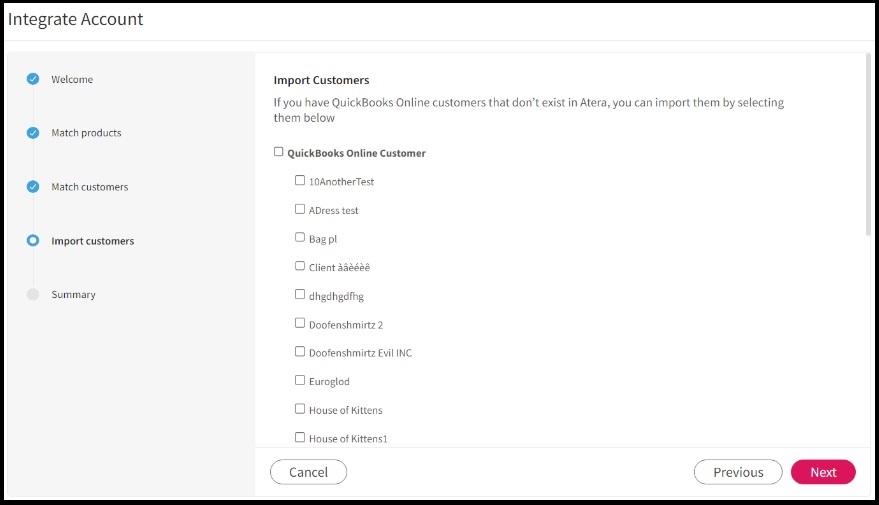
- Choose Next when finished.
- A validation screen appears, confirming Atera and QuickBooks Online sync.
- Note:
- Sync limit: 8000 products (recommended: around 1000 products).
- You need to match data manually if not synced automatically.
- Ensure to save your selection
How to Manage Atera QuickBooks Integration?
Once you have performed the Atera QuickBooks integration, you can control your integration and syncs at any time
- Access Admin in the Atera Page
- Then Accounting.
- The Accounting management page will be displayed.
You can control all elements of the Atera and QuickBooks Online synchronization from this page. This comprises handling taxes, products (and rates/services), matching customers, and importing.
Note: This page appears only after completing the sync wizard.
How to Export Invoices with Atera QuickBooks Integration in Online?
With Atera QuickBooks Integration you can easily export invoices to QuickBooks Online. The step to do so is as follows:
- Go to Billing on the side panel and
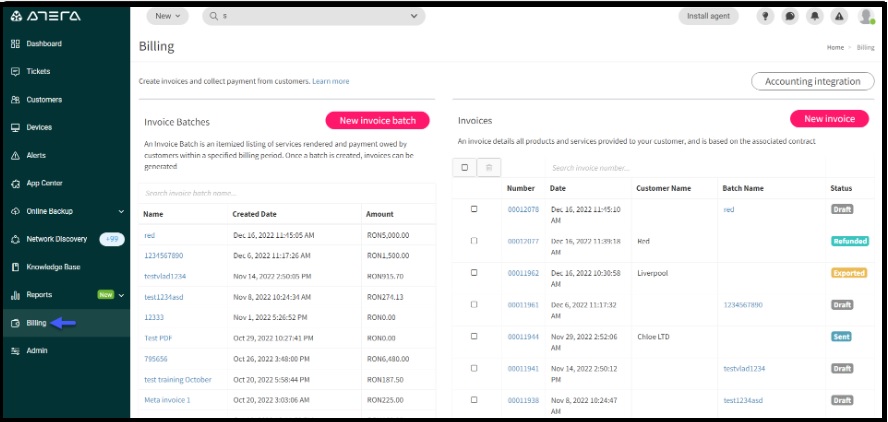
- Pick the Invoice Batch to export.

- Click Export.

- Note:
- Match unpaired Atera and QuickBooks customers for invoice recognition.
- Generate new customers in QuickBooks if required.
- New products/rates are automatically created in QuickBooks with the same pricing as in Atera.
- A default 0% tax rate is added for synchronization with QuickBooks Online International.
- Changes made in QuickBooks will not affect Atera invoices.
- Exported invoices on Atera’s Billing page can be linked to QuickBooks Online directly
How to export Invoices with Atera QuickBooks Integration in a Desktop?
For users with the desktop version of the accounting program, Atera QuickBooks integration enables them to export invoices as well. Here are the steps to perform this.
- To export invoices to QuickBooks Desktop:
- Click Billing on the left-hand side panel.
- Choose the invoice batch for export, and click on Export Invoices.
- In the Export Invoices window, select QuickBooks Desktop.
- In the QuickBooks Desktop Export Settings window:
- Choose whether to use Atera’s auto-generated invoice sequence number or a custom one.
- Click Export.
- Atera will download the Intuit Interchange Format (IIF) file to your device.
- Open and import the file into QuickBooks Desktop.
How to Disconnect Atera QuickBooks Integration?
You can discontinue with the online Atera QuickBooks integration if you no longer require it. Here are the steps
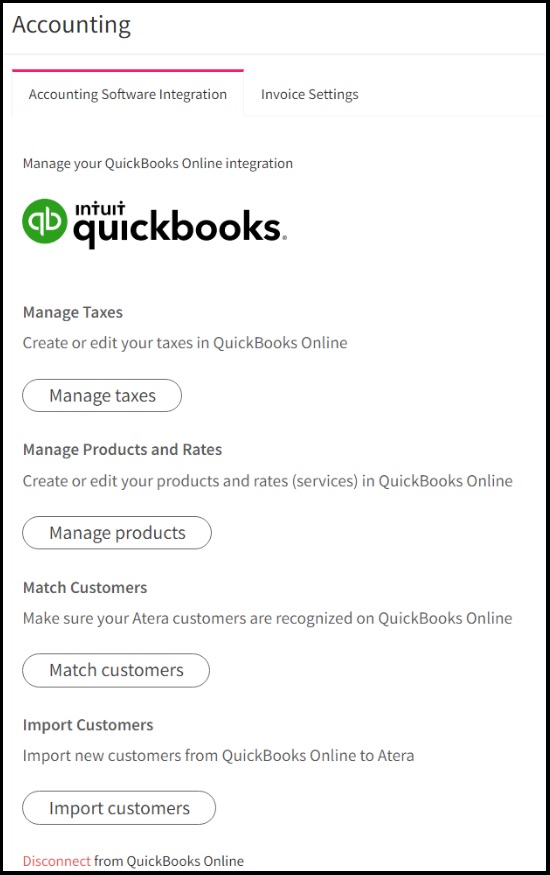
- Go to Admin > Accounting to access the Accounting Management page.
- Scroll down and select Disconnect from QuickBooks Online.
- After confirmation, Atera will be disconnected from QuickBooks Online.
What are the Benefits of Atera QuickBooks Integration?
Several benefits come with Atera QuickBooks integration. Some of them include the following:
- Streamlined Finance Management: Syncing data between Atera and QuickBooks streamlines finance processes, reducing errors and saving time.
- Accurate and Up-to-date Financial Records: Real-time updates ensure accurate financial records for tracking revenue, expenses, and profitability.
- Improved Efficiency: Automation of finance tasks frees up time for strategic activities, enhancing overall efficiency.
- Enhanced Reporting: Comprehensive financial reports offer valuable insights for informed decision-making and identifying areas for improvement.
This guide provides a comprehensive overview of Atera QuickBooks integration offering step-by-step instructions for setting up and managing the integration. Users can easily sync Atera with QuickBooks Online and Desktop, enabling seamless billing and invoice exporting. Additionally, the guide explains the process of disconnecting the Atera QuickBooks integration when needed.
Frequently Asked Questions
Automating finance tasks saves time and improves efficiency.
Yes, you can automate tasks like invoice generation and expense tracking.
No, but you can use Atera’s generic options to create custom integrations.
It streamlines processes and ensures accurate financial records.
Yes, exported invoices can be directly linked.
Yes, taxes, products, and customers are aligned for seamless billing.
There might be, but choose reliable connectors based on your needs.
By automating workflows and integrating data, it provides better insights.

