By performing QuickBooks email setup you can send and receive reports, and invoices, and perform other transactions through Outlook or Webmail. This characteristic is available in the QuickBooks Desktop version and allows users to save time while performing their tasks.

This article will discuss the different steps and information to help with QuickBooks email.
How to Perform Email Setup in QuickBooks Desktop?
By configuring QuickBooks to send emails, users can easily send and receive important data. There are certain things to think about before setting up email in QuickBooks.
Connect Outlook with QuickBooks
Step 1: Contact your ISP or email provider to obtain the following information
- Your Credentials
- Server Address for incoming mail
- The server type for the incoming type
- The server address for outgoing mail
Once you have gotten the above information. You can begin with Outlook email setup in QuickBooks
Step 2: Steps to Connect Outlook Email Account in QuickBooks
Follow the steps on how to set up email accounts in QuickBooks with Outlook
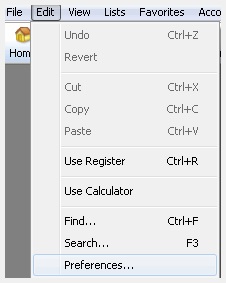
- Navigate to the Edit menu in QuickBooks.

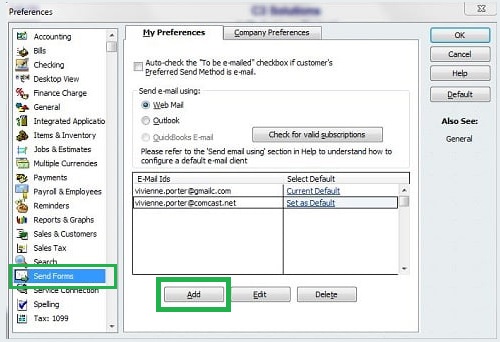
- Select Preferences and choose Send Forms.

- Choose Outlook and click OK.

Note: Ensure that you have an Outlook Profile and the version you use is 2010 or newer.
How to Connect Secure Webmail in QuickBooks Desktop?
Before you send email from QuickBooks using secure webmail there are things that you should know.
- The latest QuickBooks versions offer safer and easier email connections via secure webmail.
- Enable secure webmail in QuickBooks by linking your Intuit and Webmail accounts.
- Enabling the link saves you from having to enter your password every time you send an email.
The QuickBooks version can have secure Webmail
- QuickBooks Desktop 2023, 2019, and 2020 QuickBooks can be set up with secure webmail
- 2018 QuickBooks provides a secure webmail configuration for email such as Google Mail and Hotmail or Live account users.
Things to consider
- QuickBooks Webmail requires setting up a strong password for your company file.
- Hosted environments may require webmail login for email sending, even with Secure Webmail setup in QuickBooks.
Steps to setup QuickBooks email setup with Webmail.
- Navigate to Edit > Preferences > Send Forms in QuickBooks
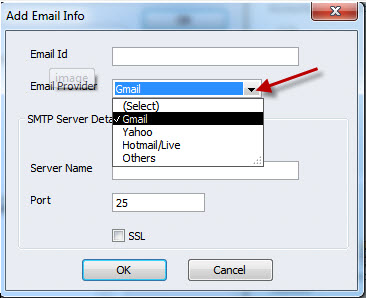
- Pick Web Mail and Add, choose your provider, and type your email address.
- Check Use Enhanced Security, and tap OK.
- Uncheck the box if you get a Network Error message.
- Sign in to your Intuit account when prompted.
How to setup email account in QuickBooks with Webmail?
For users who are trying QuickBooks email setup with Webmail can perform the steps below:
- To add an email account in QuickBooks, tap Edit > Preferences > Send Forms.
- Choose Web Mail and Add, and enter the required email information.
- Tap OK to save your changes.
How Do I Fix Unable to Send Invoice in QuickBooks Email?
Users can come across issues with QuickBooks Email. One such error is that it cannot dispatch invoices. Follow the steps below to correct the issue. Adjust your email preferences in QuickBooks.
- Navigate to Edit > Preferences > Send Forms.
- Pick your email account from the My Preferences tab, then click Edit.
- Verify the SSL box or choose Default, and ensure the name of the server is similar to the email configuration given by the provider.
How to Setup Email in QuickBooks Online to Send Receipts?
When setting up an email in QuickBooks Online to send information you must customize an email address. To do this you can do the following steps.
- To forward receipts to QuickBooks, Navigate to bookkeeping > transactions > receipts or banking > receipts.
- Pick Forward from the email, and enter a customized email address with “@qbodocs.com” at the end.
- Note: If you want to update the email address later, go to Your forwarding email and select Update.
- Write the new email address and confirm the change.
- When ready, tap Next, confirm the information, and pick ok.
- Finally, the pick is done to complete the process.
How is QuickBooks Email Beneficial?
By configuring QuickBooks email setup, users can enjoy several benefits. Here are some advantages of using the feature:
- QuickBooks’ email feature enables users to send payment reminders to customers via email.
- It also enables users to retrieve information from customers and vendors.
- Users can send invoices and estimates directly to customers using an email setup.
- The software allows for sharing reports within the office and department.
- Users can import company data from spreadsheets and attach files up to 2MB in size.
Hope the above information has helped you with a step-by-step guide on setting up email in QuickBooks and sending and forwarding important information.
Frequently Asked Questions
You can set up a QuickBooks email, by opening QuickBooks, going to Edit > then Preferences > then Send Forms > selecting WebMail >Finally, Add.
Yes, QuickBooks 2019 and later versions are compatible.
If you cannot send emails from QuickBooks to Outlook and see an error prompt, it is likely due to a settings issue.
Get hold of your email provider’s username, password, incoming email server address, incoming email server type, and outgoing email server address.
QuickBooks accepts webmail passwords.
To send invoices in QuickBooks, set up Webmail or Outlook, go to Preferences > Send Forms in the Edit menu, and choose Outlook or an alternative email client.
QuickBooks accepts webmail passwords, but you may need to enter it for the first email.
If your Gmail emails are not being sent from QuickBooks, it could be due to settings or filter preferences in your Gmail account.
Yes, you can authorize QuickBooks Desktop with Gmail.
To add an email to QuickBooks, go to Edit > Preferences > Send Forms > Web Mail > Add. Enter your email and provider, enable Enhanced Security, and click OK.
Yes, you can have multiple company email in your QuickBooks Online account.
Yes, you can configure email services within QuickBooks Desktop.

